Simple Woodworking Projects You Can Tackle with a Circular Saw and Miter Guide
This article contains affiliate links. If you purchase via a link on this page, we MAY receive a payment.
When it comes to woodworking, you don’t need a fully equipped workshop to get started. A circular saw combined with a good miter guide opens the door to dozens of rewarding and practical projects—even for beginners. These tools are not only portable and affordable but also surprisingly precise when used correctly. Whether you’re a DIY enthusiast or someone curious about starting a new hobby, the circular saw with a miter guide can help you create beautiful, functional items right from your garage or backyard.
Why the Circular Saw + Miter Guide Combo Works
A circular saw is a handheld power tool that cuts through wood with a spinning round blade. While it’s often associated with rough cuts and framing work, adding a miter guide dramatically boosts its accuracy. A miter guide helps guide the saw in a straight line or at a specific angle, allowing for clean and repeatable cuts—perfect for home projects like furniture, décor, and storage solutions.
Now, let’s dive into some beginner-friendly projects that make the most of this dynamic duo but before starting – check out these safety tips.
Tips for Using a Circular Saw Safely
-
Use clamps: Always secure your wood to a workbench or sawhorse before cutting.
-
Mark your cuts clearly: A pencil line and measuring tape are your best friends.
-
Let the saw do the work: Don’t force it. A sharp blade and steady pace result in a cleaner cut.
-
Wear eye and ear protection: Sawdust and noise are no joke. And some woods are poisonous if the dust is breathed in!
-
Keep both hands on the saw: Stay alert and keep your cutting path clear.
- Hand protection and safety: Use a guide and saw protection and wear gloves
1. Rustic Blanket Ladder
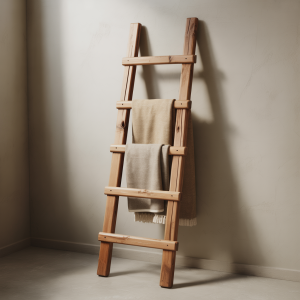 A blanket ladder is a stylish and functional way to store throws or towels. It’s also a great project to start with if you’re getting used to angled cuts with your miter guide.
Materials:
-
2×4 or 2×2 lumber (for side rails)
-
1×2 or dowels (for rungs)
-
Wood screws or nails
 Steps:
-
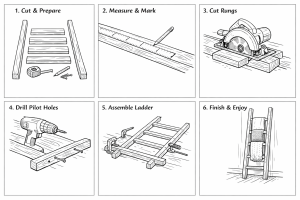
Use your miter guide to cut the rails to your desired length (typically 5–6 feet).
-
Cut the rungs to equal lengths—space them evenly about 10–12 inches apart.
-
Angle the feet at about 10 degrees so the ladder leans nicely against the wall.
-
Attach rungs with wood screws or nails. Sand and finish as desired.
2. Custom Bookshelves
Basic rectangular bookshelves are straightforward to build with a circular saw and guide, and they can be customized to fit any room or space.
Materials:
-
Plywood sheets (3/4” thickness for durability)
-
1×2 strips (for edging)
-
Wood glue and screws
Steps:
-
Use the miter guide to make precise, straight cross-cuts for shelves and sides.
-
Cut 1×2 strips for the front edges to give a professional, finished look.
-
Assemble the frame with screws, using wood glue for extra strength.
-
Sand, paint, or stain to match your decor.
3. Simple Storage Bench
Storage benches are functional and attractive in mudrooms, bedrooms, or porches.
Materials:
-
2×4 or 2×2 lumber for the frame
-
Plywood panels for seat and sides
-
Hinges (optional, for lift-up seat)
Steps:
-
Cut frame pieces to size using your circular saw and guide for square cuts.
-
Build a box frame and add supports inside.
-
Attach plywood panels for the sides and seat.
-
Add a hinged lid for storage access, or simply leave it flat.
4. Wall-Mounted Coat Rack with Shelf
Great for entryways, this compact project lets you practice both straight and mitered cuts.
Materials:
-
1×6 board for the back
-
1×4 board for the shelf
-
Hooks or pegs
Steps:
-
Cut your boards to the desired length.
-
Use the miter guide to cut angled brackets (optional) to support the shelf.
-
Attach the shelf to the backboard with screws or brackets.
-
Add hooks or pegs evenly spaced along the bottom.
5. Garden Planter Box
A rectangular planter box is a rewarding project that requires only basic cuts and assembly.
Materials:
-
Cedar or treated wood (resists rot)
-
Screws or nails
-
Landscaping fabric (optional, for lining)
Steps:
-
Cut all side pieces and base with your miter guide.
-
Assemble into a rectangle using outdoor screws.
-
Add a slatted or solid bottom.
-
Line with landscaping fabric and fill with soil.
Tool Recommendations
Circular Saw
If you’re shopping for your first circular saw, look for features like depth adjustment, bevel capability, and a blade brake for safety. A few well-reviewed options include:
-
DEWALT 20V MAX 7-1/4-Inch Circular Saw
Powerful, cordless, and accurate, this saw has great battery life and is part of the DEWALT 20V system. -
Makita 5007MG Magnesium 7-1/4-Inch Circular Saw
A corded option with a strong motor, built-in LED lights, and precision bevel adjustments. -
Skil 5280-01 15-Amp 7-1/4-Inch Circular Saw
A more budget-friendly option for beginners. Lightweight and easy to handle.
Miter Guide / Cutting Guide
-
Kreg Accu-Cut Circular Saw Track Guide
Attaches to your saw and acts like a track saw for accurate, repeatable cuts. Great for long plywood sheets. -
Bora NGX Clamp Edge Saw Guide
A versatile straight-edge clamp guide available in multiple lengths, ideal for ripping or cross-cutting. -
Milescraft Saw Guide Kit
Includes a universal saw base and guides for cross, rip, and angle cuts—ideal for DIY furniture building.
Final Thoughts
You don’t need an entire woodworking shop to start creating. A circular saw paired with a reliable miter guide can unlock a wide range of projects—from simple décor to sturdy furniture. The key is learning how to measure and cut accurately, starting with basic designs, and gradually building your skills.
So pick a project, grab your tools, and start building. You might just find a new passion—or at the very least, a handmade item you can be proud of.