Here is another article from 1899 on woodworking. Hope you enjoy these.
Nailing.—To drive nails, hold the hammer near the end of the handle. Do not, as is often done by beginners grasp it close to the head. The nearer the end of the handle you take hold, the harder blow you can strike, just as the longer the handle, the harder the blow. Use light strokes—mere taps—in starting the nail. After you are sure it is going straight you can then use more force to drive it home. Do not try to sink the nail-head quite flush with the wood. Leave that for the nail-set. You may think that any slight depression you may make if the hammer strikes the wood will be too slight to be seen, but that is not so, as the slightest dent or depression will probably show in finished work.
The head of the hammer should be swung back and forth through an arc of a circle of which the wrist is the centre. Do this carefully and steadily and you will send the nail in quicker and straighter than when you flourish the hammer wildly around in the air and bring it down with a ferocious bang somewhere in the vicinity of the nail, as beginners of all ages have been known to do.
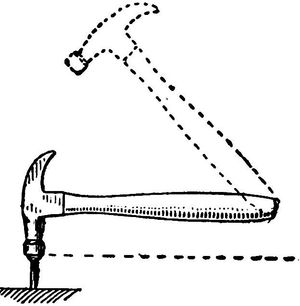
Fig. 603.
Now, remembering that the hammer-head will (and should) swing around in an arc of which your wrist is the centre, you must see that your wrist is in such a position that the hammer-head can strike the nail squarely—that is, the hammer-handle, when the head rests squarely on the nail-head, must be in a line parallel with the flat surface of the top of the nail (Fig. 603). If the wrist is much above or below this line, the nail will be struck slantingly, and either be driven crooked or bent (Fig. 604).
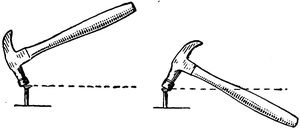
Fig. 604.
First place the hammer in the correct driving position, and then swing it back and forth as nearly in the same curve as you can. Practise this motion a little on a soft piece of board to see how squarely you can dent the board and how nearly you can hit the same dent with successive strokes.
Frequently a nail does not drive straight, but becomes bent and goes in the wrong direction. If you withdraw it do not, as a rule, try to drive another in the same hole, but start it in another place. Sometimes a nail will be bent because the face of the hammer-head has glue or grease on it. In such a case rub it on a piece of fine sandpaper or in the ashes or the ground.
Holes should always be bored when there is any chance of splitting, or when slender nails are driven into hard wood (lest they bend), but remember that the hole, particularly in the inner piece, should not be quite as large as the nail. With nails having large heads it does not matter in hard wood if the holes in the outer piece are about as large as the nails, provided the latter drive tightly into the inner piece.
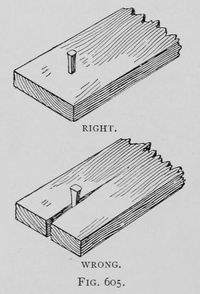
Fig. 605.
The hole made by a brad-awl is better, when it does not split the wood, than one made by a bit or drill, because it does not remove the wood but merely presses it aside, so that when the nail is driven the fibres tend to spring back to their original position and close in around the nail, helping to hold it in place.
In driving the old-fashioned nails, which have two sides parallel, while the other two incline toward the point or taper, they should be used on the same principle on which you use the brad-awl. If placed the other way, the wedge shape of the nail will tend to separate the fibres and split the wood (Fig. 605). With nails having two sides smooth and two rough, as you pick them up you can tell by the fingers which way to hold them, the rough sides going across the grain and the smooth sides with it.
Nails will drive into hard wood easier if you touch the points to grease, tallow, lard, or soap.
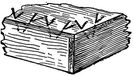
Fig. 606.
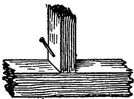
Fig. 607.
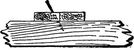
Fig. 608.
“Toe” Nailing.—If you wish nails to hold as much as possible, toe them—that is, slant them (Fig. 606). You can see at a glance that the board will be held much tighter than if the nails were driven straight up and down. Of course you cannot always drive nails this way, and there are many cases in which you would gain nothing, but it takes only a moment longer to toe nails, and it is often very useful where you wish to be sure that the work will hold together. There are many cases where you cannot nail any other way, as when you fasten a stud to the top of a sill (Fig. 607), and you can see at once that it is advantageous. Of course this is not a good method for work which you may wish to take apart again.
Slanting the nails helps to draw one piece tightly up to another, as is often desirable for a tight box or a floor (Fig. 608). You can increase this effect, after you have driven the nail part way in, by drawing the hammer towards you as you strike, or in the direction towards which the nail points, thus bending the upper part of it toward the other piece, which tends to make a tight joint.
Clinching Nails.—The way to clinch nails is simply to drive them through against a heavy hammer, or any solid metal object, held on the other side. As the point comes through it is gradually turned over or hooked around into the wood and when the head is driven home the point will be firmly embedded in the wood. Another way is to simply strike the projecting ends with light, slanting blows. This will gradually bend or curl the point over to one side, and as it bends over you can pound more directly downward until the hooked end of the nail is buried in the wood. Clinching is very useful for many purposes, as in nailing cleats on a shed door. It is usually best to bend the nails over in the direction of the grain, rather than across it.
Whether to clinch or toe the nails must depend on the work. Clinching is better for anything that is to be slammed or subjected to violent treatment, while in many cases toeing is better, and frequently you cannot reach the points of the nails to clinch them.
![]()
Fig. 609.
Blind nailing is resorted to in order to have a clear, smooth surface, as in floors laid with matched-boards. Each board is nailed just above the tongue, with the nails slanting through the solid part of the board (Fig. 609). This holds the board down and tends to force it closer to the adjoining board. The grooved edge of the next board entirely conceals the nailing and leaves an unbroken surface.